The Unreal Engine Material Editor is a powerful tool for creating and customizing materials for your game assets. Here's a guide on how to use the Material Editor in Unreal Engine:
1. Open the Material Editor:
- Open Unreal Engine and your project.
- Navigate to the "Content Browser" and right-click to create a new material.
- Double-click the newly created material to open it in the Material Editor.
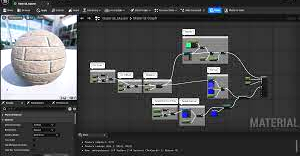
2. Material Editor Interface:
- Familiarize yourself with the Material Editor interface:
- Graph Panel: Where you create and connect nodes.
- Details Panel: Displays properties of the selected node.
- Palette: Contains various nodes for different functions.
- Toolbar: Includes tools for navigation and editing.
3. Create a Basic Material:
- In the Material Editor, right-click and select "Constant3Vector."
- Connect it to the "Base Color" input of the main node.
- Adjust the RGB values to set the color of the material.
- Press "Apply" to see the changes.
4. Texture Mapping:
- Import textures into your project.
- Drag a texture from the "Content Browser" into the Material Editor.
- Connect the texture to relevant inputs like "Base Color," "Normal," or "Roughness."
5. Scalar and Vector Parameters:
- Create parameters to allow for dynamic adjustments.
- Right-click, go to "Parameters," and add a "Scalar Parameter" or "Vector Parameter."
6. Mathematical Operations:
- Use nodes like "Add," "Multiply," or "Power" for mathematical operations.
- Connect these nodes to control the way values affect the material.
7. Material Functions:
- Create reusable material functions for complex operations.
- Right-click and select "Material Function" to get started.
8. Dynamic Material Instances:
- Create dynamic material instances to change material properties during runtime.
- Right-click the material and select "Create Material Instance."
9. Custom Expressions and Shaders:
- Use custom expressions for advanced shader programming.
- Explore the "Custom Expression" node for more control.
10. Debugging Tools:
- Utilize tools like "Pixel Inspector" to debug and understand your material during development.
11. Comments and Organization:
- Add comments to nodes by right-clicking and selecting "Comment."
- Organize your graph for clarity, especially in complex materials.
12. Preview and Visualization:
- Use the "Preview" settings in the Material Editor to visualize how your material appears under different lighting conditions.
13. Documentation and Tutorials:
- Refer to Unreal Engine's official documentation for in-depth explanations and examples.
- Explore online tutorials and community resources to learn advanced techniques.
14. Iterate and Experiment:
- Experiment with different nodes and settings to understand their impact.
- Iterate on your materials based on feedback and visual inspection.
15. Test in the Game World:
- Apply your material to a 3D mesh in the game world to see how it looks in the actual environment.
By following these steps and experimenting with different nodes and settings, you can become proficient in using the Unreal Engine Material Editor to create visually stunning materials for your game assets.
'game engine' 카테고리의 다른 글
| Cocos Creator for Beginners Tutorial (2) | 2023.10.06 |
|---|---|
| Choosing Unity Build Support (0) | 2023.10.06 |
| Unreal Engine Virtual Reality (VR) Development (0) | 2023.10.06 |
| Creating Environments in Unreal Engine Tutorial (0) | 2023.10.06 |
| Unity SDK and API Modules (0) | 2023.10.06 |


